
How to Make a Custom DVD Menu with a DVD Menu Creator [Easy to Learn]

When you playback a DVD on your DVD player, the first screen is the DVD menu. Sometimes, you will discover that a well-designed DVD menu could help you to watch the movie on video collection DVD easily. In the contrary, a poor DVD menu will bring a disaster. Some people even reported that the poor DVD menu make them upset and discard the DVDs. To create a custom DVD menu, you need a good DVD menu creator and using it in right way. In this post, we will share some best Creators and the guidance to make a custom DVD menu on different platforms.
Part 1. Make a custom DVD menu with Tipard DVD Creator
Want to make custom DVD menus effortlessly? Here we introduce a great DVD menu creator - Tipard DVD Creator. It's a great DVD menu maker that lets you customize DVD menu when you create your own DVD. It not only offers a wide selection of DVD menu templates in different styles but also makes it easy to create template-based DVD menus.
So with it, you can easily customize the menu and make personalized DVD movie. The following is step-by-step guide about how to use Tipard DVD creator to make a custom DVD menu.
How to make a custom DVD menu
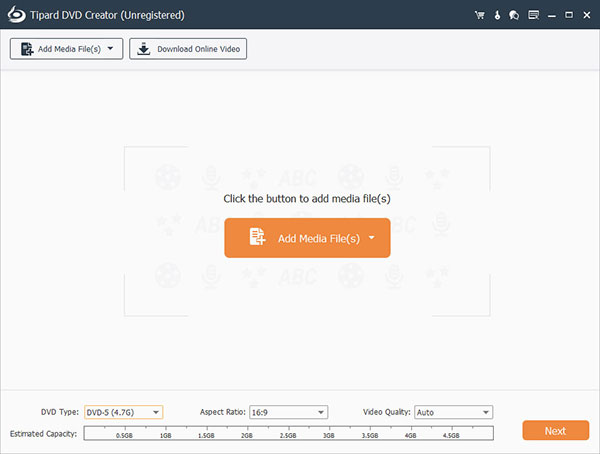
Download and run DVD Creator
Download this DVD menu creator by clicking the either of Free Trial buttons above according to your operating system. Double click the installer and install Tipard DVD creator on your computer.
Customize DVD menu
Click "Edit Menu" button in the right pane. In the open window, choose a DVD menu templates you like to edit DVD menu, and customize the frame, button and text. Then click OK to save your custom DVD menu. In addition you can download more beautiful online templates by clicking "Download Online Templates".
Save your custom DVD menu
Click the DVD Menu button and select frame, button or text to select the style you want. When all is done, click the "Save" button.
Part 2. Create a custom DVD menu on Mac computer
Mac OS is a special operating system and there are not many DVD menu creators available to Mac computers. When we search for the best way to create a custom DVD menu on Mac computer, DVDStyler appears in our mind. It is an easy-to-use DVD creator that provides extensive tools to customize your DVD menu. When it comes to the details, you can follow the steps below.
How to create a custom DVD menu on Mac
Create a new project: open DVDStyler and customize the options related to DVD creation according to your situations on the welcome window. Then click on the OK button to continue. In template window, we choose No template. Then drag and drop the video files into this DVD menu creator.
Choose background: to start create a custom DVD menu, choose the Background tab on left side and select your favorite background on the list. Or you can import a personal image as the background. Then go to the Button tab, drag the video clips or other media files and drop them on appropriate position of the background.
Add text: right-click on the empty area of the background and choose Add-> Text to add some words on the DVD menu. Double-click on the words and adjust the parameters related to the text, like color, size, front and more.
Save the project: finally, click on the burn button with a DVD icon on top ribbon to complete custom DVD menu creation.
DVD menu creators usually provide many templates and button styles. You can choose a template directly or customize a personal DVD menu.
Part 3. Customize a DVD menu on Windows for free
If you are looking for a free way to make a custom DVD menu on Windows, you can try Windows Movie Maker. This program is released by Microsoft and is a part of Windows Live Essentials suite. So, for all Windows users, Windows Movie Maker is DVD menu creator without any cost. On the other hand, Windows Movie Maker is easy to use.

How to customize a DVD menu on Windows
Go to Windows Movie Maker and import all video clips, photos and audio you want to include on the DVD. Then arrange the videos by hitting the arrow buttons.
Click the Options label to decide the function of the menu. In the Choose DVD Playback Settings area, select Start with DVD Menu or Play Video and End with DVD Menu. Then click on the OK button and hit Next to continue.
Choose an appropriate menu style from the list and hit Customize Menu to open settings window. Then you can customize the options, like font, button and more. When settings are done, click on the Preview button to view the result. If you are satisfied with the result, just click on Change Style to confirm changes.
Click on the Menu Text button to customize the text on DVD menu. And then hit the Change Text button to save it.
Finally, click on the Burn button to start author a DVD.
Windows Movie Maker is a simple custom Creator, although the templates are not plentiful.
Conclusion
In this tutorial, we introduced how to make a custom DVD menu on different platforms. Mac users could follow the guidance described above to make a custom DVD menu with a DVD menu creator, like DVDStyler. For Windows users, Windows Movie Maker is a good choice to create a custom DVD menu with simple steps. If you need a more powerful one, you can try Tipard DVD Creator. It is compatible with both Windows and Mac computers. Moreover, it provides extensive templates and powerful tools to help create a DVD menu. In a word, Tipard DVD Creator is a smart choice for both ordinary people and advanced customers.

 How to Make Custom DVD Covers
This is a step-by-step guide covering the basic steps you need to take to make a custom DVD cover.
 Make a Custom DVD Menu with a DVD Menu Creator
Here are the best ways to make a custom DVD menu with a DVD menu creator. Choose the one you like to create a charming DVD menu.
 The Best DVD43 Alternative to Decrypt DVD
Here's a quick guide on decrypting your DVD's copy protection and copying dvds with the best DVD43 alternative.
 How to Burn Movies to DVD Effectively
Here's we include the best solutions to encode movies and burn movies to DVD. Learn today and enjoy your favorite movies on larger screen freely forever.
